I used to think pruning tomatoes was fussy, almost performative — the sort of thing you did if you had time and liked things tidy, but not if you wanted actual tomatoes. Then I had the August where my two indeterminate ‘Brandywines’ fused into a single, humid hedge. You could barely see flowers inside, let alone reach them. Fruits near the soil rotted where air never dried. Hornworms hid perfectly in the thicket. And by late July, early blight marched up the lower leaves so fast I was stripping armfuls.
That hedge taught me: pruning is not about tidiness. It’s about light, air, and energy. It’s deciding where the plant will put its effort so you get more ripe, clean fruit on fewer, stronger stems instead of a leafy maze with fruit hidden like Easter eggs in the dark.
I still remember the first time I pruned correctly — a dry morning, shears wiped with alcohol, suckers 2 to 3 inches long snapping crisply at the base. The bed looked a little thinner that evening, almost vulnerable. Ten days later, fruits I hadn’t even seen were blushing because they finally had sun, and the foliage that stayed was deeper green and dry by noon. That is the trade: a little leaf removed, a lot of disease prevented, and a lot more tomatoes you can actually find and harvest.
Let’s walk through how to prune simply, confidently, and at the right time, so your tomatoes breathe, ripen, and keep producing until frost without becoming that August jungle.
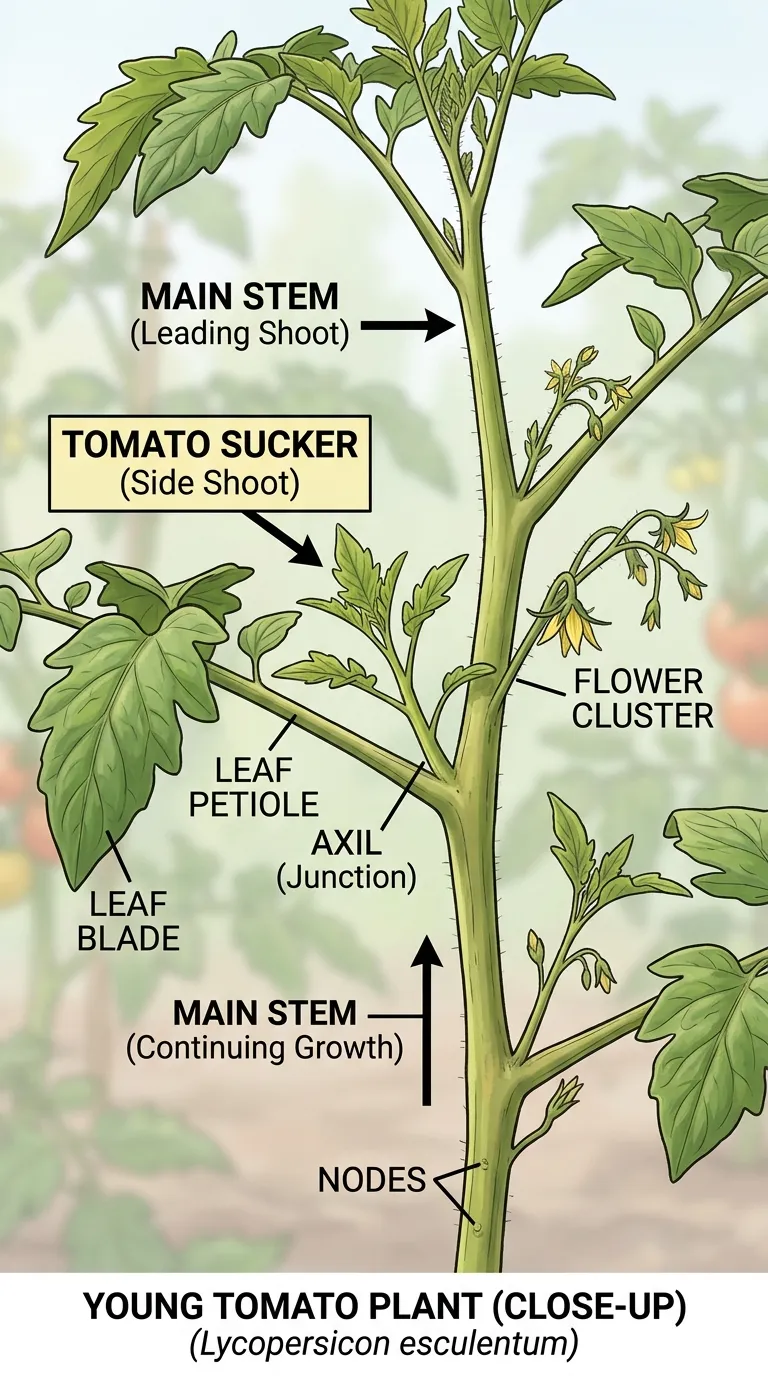
Quick Answer: Prune indeterminate tomato plants by removing suckers — the shoots in the V between leaf branch and main stem — when they are 2 to 4 inches long, especially those below the first flower cluster, and keep 1 to 2 main leaders. Remove lower leaves touching soil or mulch and any spotted or yellowing foliage weekly. Prune on dry mornings with clean, sharp shears, never removing more than one-third at once, and leave at least two-thirds of foliage to feed fruits and prevent sunscald. For determinate bush types, prune only lightly.
At a Glance
| Pruning Task | When & How | Why It Helps |
|---|---|---|
| Remove suckers (indeterminate) | 2-4 inches long, pinch or snip at base | Directs energy to fruit, opens airflow |
| Keep leaders | 1 to 2 leaders per plant | Stronger stems, easier staking |
| Lower leaves | Any leaf touching soil or mulch | Stops soil splash disease |
| Diseased/yellow leaves | Weekly, dry morning, trash immediately | Slows blight and septoria spread |
| Topping (late season) | 4 weeks before first frost, pinch growing tip | Ripens existing fruits before frost |
| How much to remove | Max one-third at once, keep 2/3 foliage | Leaves are sugar factories; protects fruit |
| Tools | Sharp shears, alcohol wipe between plants | Clean cuts heal fast |
Why Prune at All? The Three Jobs Pruning Actually Does
Pruning does three quiet things that together change your harvest more than any fertilizer tweak.
1. It moves energy. Every sucker is a potential new vine that wants to become its own plant, with its own leaves and flowers. Left unchecked on an indeterminate, one plant can try to be five plants. That spreads finite sugars thin. Removing early suckers says to the plant, focus here — make these fruits excellent rather than make many fruits small and late.
2. It gives air. Humid, still air inside a dense canopy keeps leaves wet for hours after dew or rain. Fungi love that. Opened canopies dry by noon, and spores fail to germinate. Staking plus pruning is the combination that does more against blight than any organic spray alone — and see how to grow tomatoes for how staking and pruning fit together.
3. It gives light. Interior fruits that never see sun stay pale on shoulders, ripen unevenly, and invite slugs. A pruned, upright plant bathes trusses in light; they color evenly and taste sweeter because leaves near them actually photosynthesize well.
Think of pruning as traffic control, not punishment. You are not hurting the plant; you are helping it decide.
Know Your Type — Prune Differently for Determinate vs. Indeterminate
This is the fork where beginners often go wrong, so let’s make it simple.
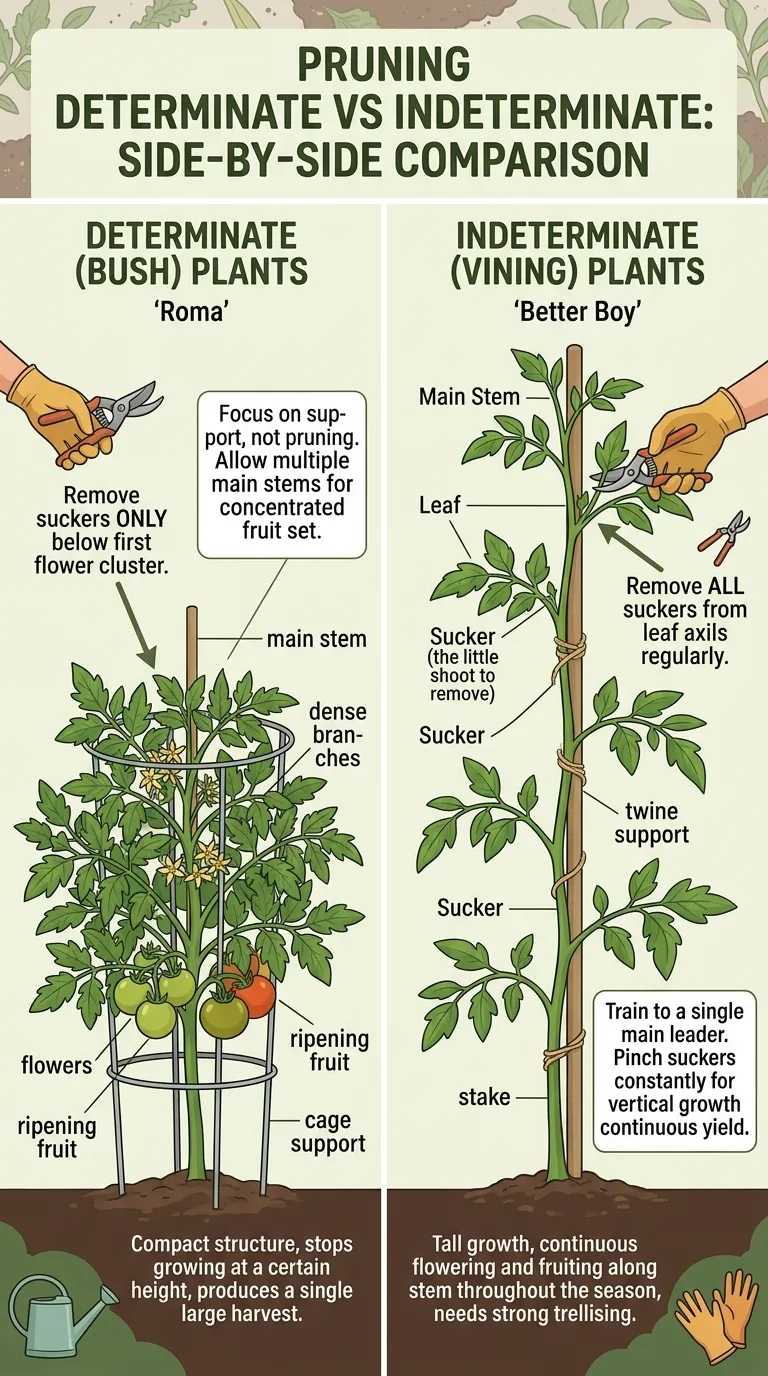
Indeterminate (vining) tomatoes — most slicing and cherry types, including ‘Sweet 100,’ ‘Brandywine,’ ‘Early Girl’ — keep growing, flowering, and fruiting until frost. They want pruning: remove suckers below the first flower cluster early, then maintain 1 to 2 leaders all season. You’ll get larger fruits and a longer window.
Determinate (bush) tomatoes — many paste types like ‘Roma,’ plus compact bush slicers — grow to a fixed height (around 3 to 4 feet), set most fruit in a 2 to 3 week wave, and stop. They want little pruning. Removing their suckers removes a sizable chunk of that one harvest. For determinate, I only remove leaves touching soil, plus any spotted or truly yellow leaves, and otherwise let them bush.
Not sure which you have? Check the tag or seed packet. If it says “determinate” or “bush,” prune lightly. If it says “indeterminate” or “vine,” prune weekly. When in doubt, prune less — you can always take more next week, but you can’t glue a leaf back.
When to Start and How Often — The Weekly Ritual That Takes 10 Minutes
Wait until plants are 12 to 18 inches tall and first suckers are 2 to 4 inches — usually 2 to 3 weeks after transplant. Before that, let the plant establish. Suckers smaller than an inch tear less cleanly; wait until you can snap them crisply.
Then, make it a weekly habit. I prune every Sunday morning after the dew dries, while stems are crisp and cuts heal fast in dry air. I bring a jar with rubbing alcohol, a rag, and a small bucket for trimmings.
Why morning? Three reasons: stems snap cleanly when turgid but not wet, any sap on the cut dries during the day, and you can see airflow improve by afternoon.
How long does it take? For 6 to 8 indeterminate plants, about 10 minutes once you know the pattern. It’s the cheapest insurance against disease that month, because catching one spotted leaf at 2 inches saves you from stripping a branch at 12 inches later.
See tomato leaves turning yellow for how to diagnose what to remove, and how often to water tomato plants to pair cuts with watering rhythm.
Step-by-Step — How I Prune an Indeterminate Tomato, Start to Finish
Step 1: Gather Tools and Sanitize
Sharp bypass pruners or even clean fingernails for soft suckers under 3 inches. A small jar of rubbing alcohol and a rag. Wipe blades between plants, especially if any show spots. This 10-second habit stops you from carrying blight from one plant to the next.
Step 2: Find the Sucker — The V You Are Looking For
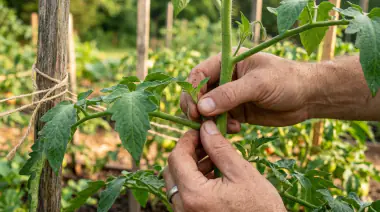
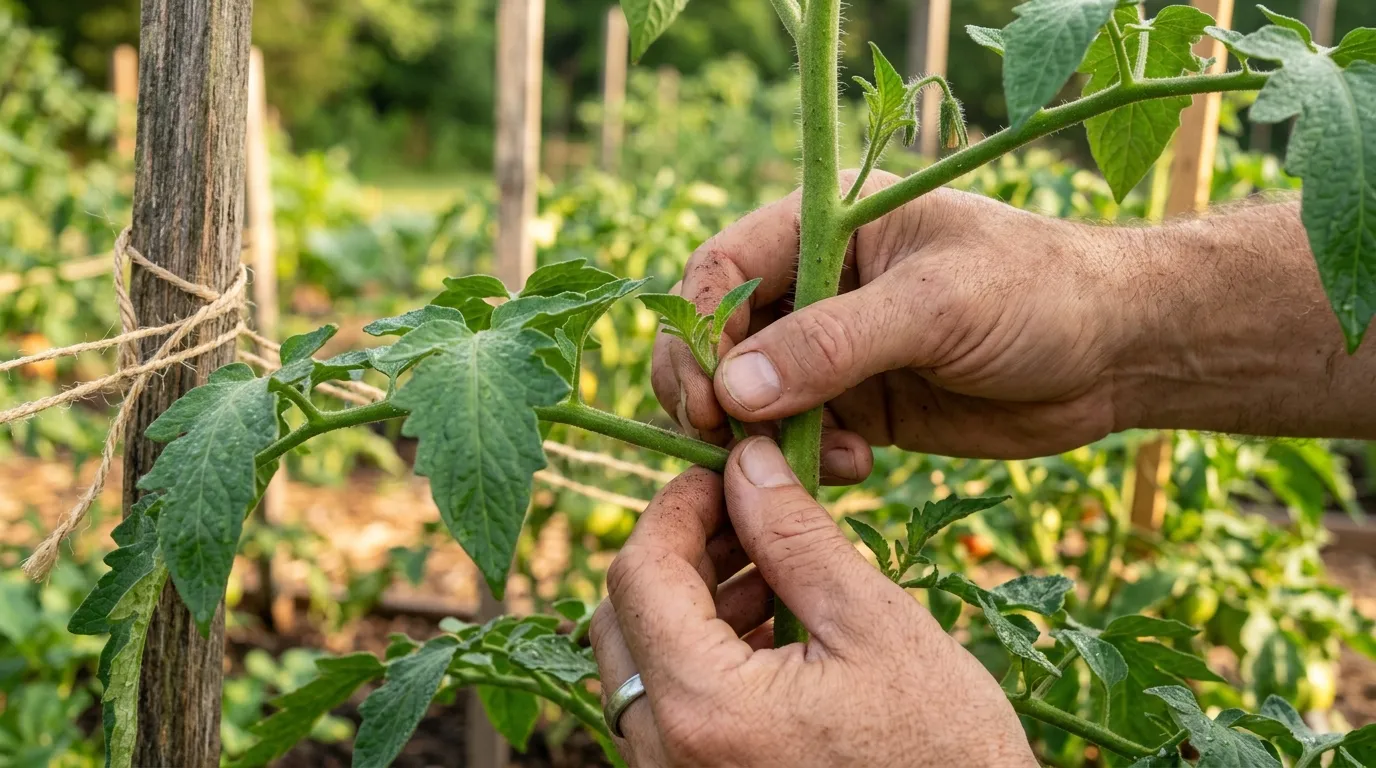
Follow the main stem up. Where a leaf branch meets the stem, you’ll see a tiny shoot emerging right in that angle — between stem and leaf branch, pointing up. That’s the sucker. At 2 to 4 inches, it’s obvious: a miniature new vine with its own tiny leaves.
Step 3: Remove Below the First Flower Cluster First
Start low. Those lowest suckers are the least productive and most disease-exposed near soil. Pinch or snip them flush without leaving a stub. A clean break heals fastest. If a sucker has grown thick as a pencil and woody, use shears and cut close — don’t rip; a tear invites bacteria.
Step 4: Decide on One or Two Leaders
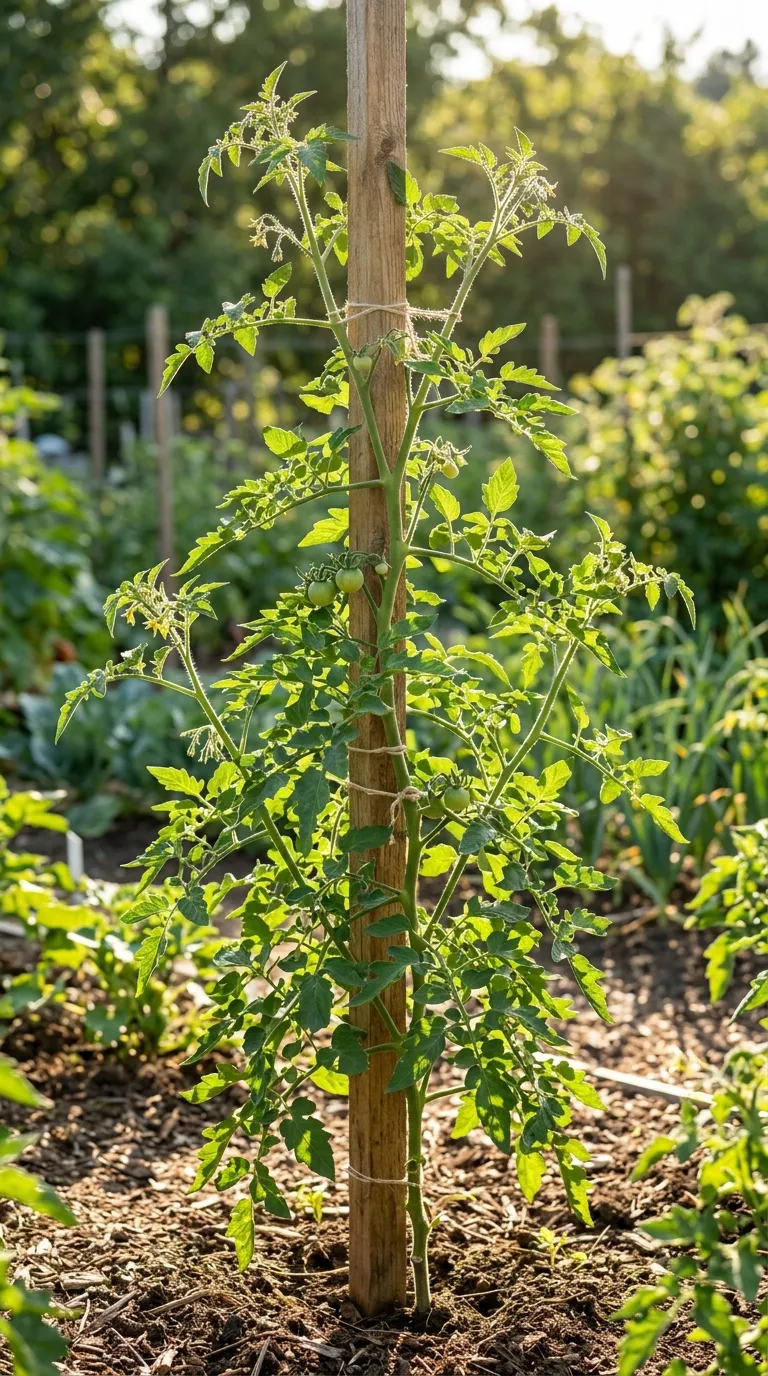
This is the artistic choice. One leader = single main stem, all suckers removed, maximal air, largest fruits, needs tall stake. Two leaders = keep one strong sucker just below the first flower cluster as a second stem, remove the rest. I grow most slicers as one leader, cherries as two leaders for more trusses without chaos.
Tie remaining stems loosely to a 6-foot stake or panel every 10 to 12 inches with soft twine or t-shirt strips. Don’t choke the stem.
Step 5: Clear the Soil Touch Zone
Remove any leaf or leaflet touching soil or mulch. That zone is splash central for early blight and septoria. I clear 8 to 12 inches of open stem at the base once plants are 18 inches tall, even if those leaves look healthy. It looks stark for a day; then you notice how much faster the bed dries.
Step 6: Keep Two-Thirds — The Rule That Prevents Sunscald
Never remove more than one-third of foliage at once, and never strip leaves that shade developing fruits. I keep at least two-thirds of leaves overall. Those leaves are sugar factories and sunscreen. Fruits exposed to brutal afternoon sun without leaf cover get white, papery sunscald that ruins flavor.
If you’ve been over-enthusiastic, shade fruits lightly with a floating row cover for a few days while new foliage regrows.
Step 7: Close the Loop — Water, Trash, Note
Water at the base if soil is dry, but not directly on cuts for a day if you can. Bag any diseased or spotted trimmings for trash — never compost them. Healthy trimmings can go to compost. Add a quick note: date + how many suckers + any spots seen. That line becomes next year’s calendar.
Lower Leaves, Spotted Leaves, and Late Season Topping — The Three Special Cases
Lower leaves touching soil: Remove them as soon as plants are established, even if green. Think of it as raising the bed’s hemline so soil splash can’t reach. See best soil for tomatoes for why soil-borne spores are ever-present.
Spotted or yellow leaves with halos: This is triage. If you see brown spots with yellow halos (early blight) or many tiny dark dots (septoria), remove affected leaves immediately, trash them, and avoid shaking the plant. Then mulch and water only at the base before 10 a.m. so remaining foliage dries. Early removal plus mulch stops upward march more than any spray I own. See tomato leaves turning yellow for detailed diagnostics.
Topping (late season): About 4 weeks before your average first fall frost — for me, early September — pinch off the growing tip of each indeterminate leader, plus any new flower clusters that won’t have time to set ripe fruit. This redirects sugars into sizing and ripening existing green fruits. It’s a small, bittersweet snip that says, finish what you started rather than chase impossible new tomatoes into cold.
Determinate Tomatoes — The Gentle Hand
If you’re growing determinate ‘Roma’ or bush ‘Celebrity,’ prune with a much lighter touch:
- Do clear the base of soil-touching leaves.
- Do remove badly spotted or broken leaves.
- Don’t systematically strip suckers — each adds to the one harvest wave.
- Do still stake or cage, because determinate fruits are heavy in that short window and branches snap.
I nearly halved a ‘Roma’ harvest one year by pruning it like a vine. That error cost a sauce batch. Now my determinates get a minimal haircut and my vigorous pruning energy goes to the vines that reward it.
Common Mistakes — What I See Every Summer at Community Beds
-
Pruning when plants are wet or in evening humidity. Cuts stay open and invite infection. Prune on dry mornings after dew dries, at least a day after rain.
-
Removing too much at once — the “clean trunk” look. A bare stem with all leaves stripped up two feet looks tidy and gives you sunscald. Keep two-thirds; clear only the soil zone.
-
Leaving long stubs when removing suckers. A half-inch stub regrows weakly and can rot. Remove flush to the stem.
-
Pruning determinate bushes hard. You lose yield. Save your technique for indeterminates.
-
Not sanitizing between plants. One infected plant becomes three in a week. A quick alcohol wipe is faster than stripping later.
-
Tying too tightly with thin wire or string. It cuts into swelling stems. Use soft, wide ties and re-tie loosely as vines grow.
Have you done one of these? I have — twice, before I learned to pause and ask, is this sucker below or above the first flower, and is this the right type to prune?
Seasonal Calendar — A Pruning Timeline You Can Tape to the Shed
-
Transplant to 2 weeks: No major pruning. Let roots establish. Only remove a leaf that touches soil at planting.
-
3 weeks (12-18 inches, first suckers 2-4 inches): First real pruning. Remove suckers below first flower, keep 1 or 2 leaders, clear base, tie to stake.
-
Early summer to midsummer: Weekly Sunday prune — 10 minutes. Remove new suckers, any spotted leaf, any leaf touching mulch. Re-tie as needed. See how to grow tomatoes for parallel feeding.
-
Mid-July (first fruits quarter-sized): Lighter pruning as fruits size. Don’t expose shoulders to sun. Keep even moisture.
-
4 weeks before frost: Topping — pinch tips and new flower clusters. Stop heavy pruning; let sugars go to ripening.
-
At frost warning: Harvest all, ripen indoors. Pull vines, trash if diseased, compost if healthy. Wash stakes in 10% bleach.
Troubleshooting — When Pruning Reveals Another Issue
-
After pruning, fruits get white papery patches? That’s sunscald from too much leaf removal. Provide temporary light shade with row cover for a few sunny days and leave more leaf cover next time.
-
After pruning, cuts turn brown and mushy? You likely pruned wet leaves or left stubs. Next time prune dry, cut flush, wipe blades with alcohol.
-
New suckers explode a few days after pruning? Normal. Indeterminates push new suckers constantly in warm weather. Weekly removal prevents them from getting woody and hard to snap.
-
Plant wilts after a heavy prune? You removed more than a third and shocked it. Water gently at base, provide light shade for a day, and wait. It will recover, but new growth slows for a week.
-
Spots keep moving up despite pruning? Add mulch 3 inches immediately to block splash, water only at base before 10 a.m., and rotate crops next year — 2 to 3 years without tomatoes, peppers, or potatoes in that bed if blight was severe.
Tools, Cleanup, and Recovery — The Details That Make It Easy
I keep a small pruning kit by the door: bypass pruners sharp enough to cut paper, a zip bag of alcohol wipes, soft ties, and a bucket. Dull pruners crush stems; sharp ones make a clean, quick-healing cut.
After pruning, I water at the base only if needed, not overhead. Then I note in my pocket notebook: date, variety, suckers removed, any spots. That five-second note turns into wisdom next June when I remember which variety suckered most aggressively and which stayed cleanest.
And if you over-pruned? Don’t panic. The plant will push new leaves. Give it a week, keep water even, and next Sunday prune lighter. Tomatoes are forgiving when cuts are clean and the crown stays dry.
The Bigger Picture — Pruning as Part of a System
Pruning shines when it partners with three other habits: staking (so pruned vines have support), mulching (so bare base doesn’t splash), and watering at the base (so opened canopies dry fast). Alone, pruning helps. Together, they keep foliage green into September.
If you grew without pruning before, try it on half your plants this year. Keep the other half unpruned as a control. Harvest will tell you which you prefer — and my bet is that by late August, the pruned row is cleaner, easier to pick, and shows fewer spots.
A Deeper Seasonal Lens — What Changes When You Watch Closely
I keep a waterproof notebook in my apron pocket. One line a week, no more. Date, weather, what I did, what leaves looked like.
That tiny log taught me more than any book. Because the garden repeats itself, softly. The same bed that yellowed after a four-day rain last July yellows the same week this July — unless I mulch higher and prune lower before the rain.
Try it this season. Just one line every Sunday. You will have a personal almanac by September.
Notes From My Notebook — Three Years That Shaped This Guide
Year one: I overwatered with love. Flag in bed: “DO NOT WATER UNTIL FINGER 2 INCHES.” Yield doubled.
Year two: pH 7.4 after liming for beans. No fertilizer greened top leaves until sulfur in fall.
Year three: Cold nights at 45°F. Peppers stalled until July. Tomatoes beside them merely slowed. Waiting an extra week after tomatoes for peppers became permanent rule.
Those three lines are why this guide insists on finger tests, pH kits, and patience.
Troubleshooting Appendix — More Real Dialogues
“My soil looks great but fruits still have green shoulders.” Often potassium-light or too much shade on tops. Ensure second-half feed has good K (last number) and thin lightly for light.
“I mulched and still got blight.” Mulch helps but doesn’t erase wind-borne spores. Prune lower leaves for airflow, water at base, rotate next year 2 to 3 years without nightshades in that bed.
“Can I use garden lime to stop blossom end rot?” Only if soil test shows low pH. Otherwise even water is the fix. Lime without need raises pH and locks iron.
“Do I need to buy bees?” Lovely for ecology, not required for tomatoes or peppers which self-pollinate. Wind and your midday shake are the engine. Wild bees are a bonus that companion herbs invite.
“What if I only have a balcony?” Containers are honest. They dry fast and leach fast. Choose 7 to 10 gallon fabric bags, quality potting mix, morning sun, and check lift test daily. You can grow a surprising harvest in two bags and a bucket of basil.
The Quiet Math of Even Moisture — Why Mulch Beats More Water
Bare soil at 90°F loses nearly half an inch of water a day to evaporation. Straw mulch cuts that by roughly half. So 3 inches of straw is effectively like getting an extra watering without turning on the hose.
It also keeps soil splash from reaching lower leaves. That splash carries blight, septoria, and bacterial spot spores that overwinter in soil. Mulch is a clean sheet between soil and leaf. I lay it after soil passes 60°F, keeping a 2-inch collar open at stems so crowns breathe.
Have you measured how fast your bare bed dries vs. mulched? Try two fingers, two spots, same day. You’ll see why mulch is the first line, not the last.
Container, Raised Bed, and In-Ground — How the Same Plant Tells Different Stories
Containers tell you quickly. They yellow fast when wet or dry, and they forgive fast when corrected. Check lift plus finger daily in July. Half-strength liquid feed weekly during heavy fruiting plus monthly granular side-dress keeps them green without burn.
Raised beds tell you in mid-summer. They leach nitrogen after heavy rain, so lower leaves fade uniformly. A light side-dress perks them back in days.
In-ground clay tells you slowly. It holds water longest, so overwatering yellowing lingers. If trowel shines with smeared clay two days after rain, wait despite calendar. Annual fall compost turns clay to crumbs over seasons.
Name your setup. The yellowing pattern narrows to two likely causes instead of eight.
Final Encouragement — The Gardener Learns Slower Than the Plant
The plant responds in days. The gardener learns in seasons. Be patient with yourself.
If you fix water this year and pH next year and pruning the year after, you will still harvest beautifully each year — just more beautifully as you go. I wish someone had told me that good gardening is cumulative, not perfect on the first try.
Pick one habit from this guide to practice this week. Just one. Water at base before 10 a.m., or shake flowers at midday, or lay that straw mulch. Do it for seven days. Look at new growth. That is your feedback loop, truer than any forum.
Frequently Asked Questions
Q: How do you prune tomato plants for better yield?
A: Prune indeterminate tomatoes by removing suckers below the first flower cluster when they are 2 to 4 inches long and keeping 1 to 2 leaders, plus clearing lower leaves that touch soil or mulch. Prune on dry mornings with clean shears, never taking more than one-third at once, and leave at least two-thirds of foliage to feed fruits and prevent sunscald. Weekly 10-minute sessions from June through August keep air moving and let light reach trusses so fruits size and ripen evenly. For determinate bushes, prune only lightly — just the soil-touch zone and any spotted leaves — so you keep their one concentrated harvest.
Q: When should you start pruning tomato plants?
A: Start when plants are 12 to 18 inches tall and suckers are 2 to 4 inches long, usually 2 to 3 weeks after transplant. Continue weekly through midsummer, removing new suckers, spotted leaves, and any growth that crowds airflow. If suckers are already thick and woody, use sharp shears to cut flush rather than ripping. Early pruning below the first flower cluster sets the structure, and topping 4 weeks before first frost — pinching the growing tip and new flower clusters — directs energy into ripening existing fruits rather than starting new ones that won’t mature.
Q: Should you prune determinate tomato plants?
A: Prune determinate bush tomatoes lightly or not at all, removing only leaves touching soil and truly damaged or spotted foliage. Heavy pruning reduces their one concentrated harvest because each sucker adds fruit on determinate types that set in a 2 to 3 week window. Keep them staked or caged to support heavy fruit loads, and focus your systematic sucker removal on indeterminate vines where it pays off in larger fruits, better airflow, and longer picking. If you’re unsure of the type, prune less and observe — you can always remove more next week.
Q: Can pruning prevent tomato diseases?
A: Yes, pruning is one of the most effective non-chemical disease preventions. By opening the canopy, you let leaves dry by noon, reduce humidity that fungi need to germinate, and remove the lowest leaves where early blight and septoria spores arrive via soil splash. Combined with staking at planting, 3 inches of straw mulch after soil warms, and watering strictly at the base before 10 a.m., pruning dramatically slows disease progress. Sanitize blades with alcohol between plants and trash — never compost — spotted leaves to stop overwintering. It won’t cure already spotted leaves, but it protects all new growth.
Related Articles
- How to Grow Tomatoes
- Tomato Leaves Turning Yellow
- Best Fertilizer for Tomatoes
- Best Soil for Tomatoes
- How Often to Water Tomato Plants
- Tomato Companion Plants
Sources & References
- Iowa State University Extension — https://hortnews.extension.iastate.edu/pruning-tomatoes
- University of Minnesota Extension — https://extension.umn.edu/yard-and-garden/vegetables/pruning-tomatoes
- Cornell Vegetables — https://www.vegetables.cornell.edu/crops/tomatoes/
- NC State Extension — https://content.ces.ncsu.edu/pruning-tomatoes-for-health
- University of California IPM — https://ipm.ucanr.edu/PMG/GARDEN/VEGES/tomato.html
