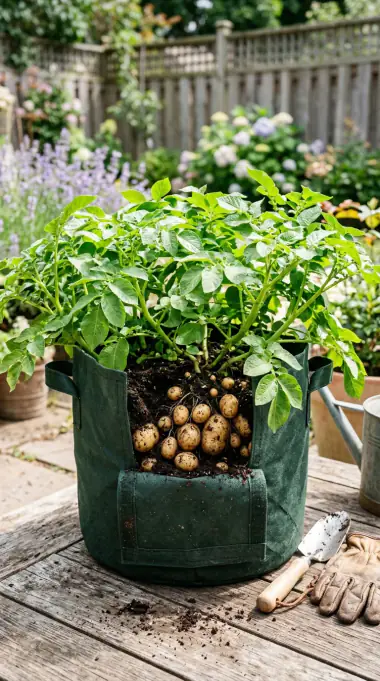

Potatoes are the most rewarding crop you can grow in a container. A single grow bag can feed a family for a week, the plants are almost indestructible, and the harvest moment - tipping the bag over to find a nest of new potatoes - is one of the most satisfying experiences in gardening. If you only have a balcony, a patio, or a sunny corner of a driveway, this guide will show you exactly how to grow potatoes in containers from start to finish.
Quick Answer: To grow potatoes in containers, plant certified seed potatoes 4 inches deep in a large pot or grow bag filled with loose potting soil mixed with compost. Add more soil as the plants grow (“hilling”), keep the soil evenly moist but never soggy, put the container in at least 6 hours of sun, and harvest new potatoes 8–12 weeks after planting or full-size potatoes once the foliage dies back.
Why Grow Potatoes in Containers?
Container-grown potatoes are not a compromise - for many gardeners, they are the better option. Backyard soil is often heavy clay, full of rocks, or contaminated with disease, and containers skip all of those problems. You fill the container with fresh, healthy soil every single year, which means blight and scab are far less likely to show up in your crop.
Container potatoes are also easier to harvest. Instead of digging through the ground with a fork, you simply tip the container over onto a tarp. The entire harvest spills out in seconds, and you can see every single potato. No fork marks, no missed tubers, no back pain.
Space is the other big win. A 10-gallon grow bag takes less than 2 square feet of floor space, yet it can produce 5 to 10 pounds of potatoes. You can line up several bags along a sunny wall, on a balcony, or even on a patio table. In many ways, growing potatoes in containers beats digging a ground bed for small-space gardeners.
| Benefit | Container potatoes | In-ground potatoes |
|---|---|---|
| Space needed | ~2 sq ft per bag | Large dedicated bed |
| Fresh soil every year | Yes | Not practical |
| Harvest ease | Tip over, done | Dig and hunt |
| Risk of soil diseases | Low | Higher |
| Weeding | Almost none | Regular |
| Cost to start | One bag + soil | Tillage/garden prep |
What You Need to Grow Potatoes in Containers
The shopping list is short, and most gardeners already own most of it. You need:
- A container. Grow bags (fabric pots) are ideal because they drain well, keep the roots cool, and let the soil breathe. A 10-gallon bag is the sweet spot for 2 to 3 seed potatoes. Plastic pots or buckets work too, as long as they have drainage holes. Avoid anything transparent - light turns potatoes green.
- Seed potatoes. Buy certified seed potatoes from a garden center or online supplier. Do not use potatoes from the grocery store: they are often treated to prevent sprouting and may carry disease. One pound of seed potatoes plants roughly 3 to 4 containers.
- Potting soil. Use a high-quality potting mix, not garden soil. Garden soil compacts in containers, drowns the roots, and often brings pests with it. Mix in one part compost or well-rotted manure for every three parts potting mix, plus a handful of balanced organic fertilizer.
- Sun. A spot with at least 6 hours of direct sun, and ideally 8.
- Water. A watering can or hose. Potatoes need consistently moist soil, and containers dry out fast in summer heat.

Choose the Right Potato Variety for Containers
Almost any potato grows in a container, but early varieties are the classic container crop because they are quick, compact, and reliable. Here is a quick guide:
| Variety type | Examples | Days to harvest | Best for |
|---|---|---|---|
| First early | Red Duke of York, Colleen, Winstone | 8–10 weeks | New potatoes, quickest results |
| Second early | Charlotte, Nicola, Kestrel | 10–14 weeks | New potatoes and small bakers |
| Main crop | Maris Piper, King Edward, Desiree | 14–20 weeks | Full-size storage potatoes |
| Salad specialty | Pink Fir Apple, La Ratte | 14–16 weeks | Boiled salads, flavor lovers |
First and second earlies are the most forgiving for beginners because you harvest them young, before blight season arrives in most climates. If you want a single container that feeds you all summer with a long harvest window, plant one early container and one main-crop container.

Step 1: Chit Your Seed Potatoes
Chitting simply means encouraging your seed potatoes to sprout before planting. It gives your plants a 2-week head start and a slightly earlier, slightly bigger first harvest.
Place the seed potatoes in an egg carton or a shallow tray with their “eyes” (the dimples where sprouts grow) facing up. Put them in a bright, cool spot - a windowsill indoors or a frost-free shed - with temperatures around 50–60°F (10–15°C). Do not put them in the dark; they will grow long, white, weak shoots instead of short, green, strong one.
After 3 to 4 weeks, each potato should have several chunky shoots about half an inch long. They are ready to plant. If you plant them directly without chitting, that is completely fine too - they will sprout in the soil on their own, just a little later.
Step 2: Plant Your Seed Potatoes
Fill your container with about 4 to 6 inches of your soil-compost mix, then place the seed potatoes on top with the chitted shoots facing up. Space them evenly: 2 to 3 potatoes per 10-gallon bag, or just one or two in a bucket. Cover them with another 4 inches of soil and water well.
When to plant: Potatoes are planted in spring, once the soil is above 45°F (7°C) and the risk of hard frost has mostly passed. A rough rule is 2 to 4 weeks before your last expected frost date. Main crop varieties can go in a few weeks later. If you are planting in fall in a mild-winter climate, choose a variety bred specifically for winter growing.
Water the container thoroughly after planting. The soil should feel like a wrung-out sponge - moist through the whole bag, but not pooling at the bottom.
Step 3: Hill Them Up as They Grow
Hilling is the process of adding more soil or compost around the stems as the plants grow. It is the single most important step for fluffy, non-green potatoes.
When your potato plants are about 6 to 8 inches tall, add roughly 4 inches of soil mix around the stems, covering the lower leaves. The buried part of the stem grows new “stolons” - the underground branches that form potatoes. The more buried stem you have, the more potatoes you get.
Repeat the process every 1 to 2 weeks until the container is full, right up to about 2 inches below the rim. You can also use straw or shredded leaves for the final fill. Never let tubers poke above the soil line or they will turn green and become bitter.
This is where big containers win. A tall bag lets you keep adding soil for a full month or more, dramatically increasing your harvest. A shallow bucket caps your hilling quickly - another reason to use the largest container you can manage.

Step 4: Water and Feed Correctly
Watering is where most container potato crops are won or lost. Potatoes need consistent moisture: soil that is allowed to dry out completely causes small, uneven, lumpy tubers, while soil that stays soggy rots the roots and invites disease.
Check the container daily in warm weather. If the top inch of soil feels dry, water until it runs out of the drainage holes. On hot summer days, a 10-gallon bag in full sun may need water every day. Fabric grow bags dry out faster than plastic pots - check them twice daily in heat waves.
As for feeding, potatoes are hungry but simple. Mix a balanced organic fertilizer into the soil at planting, then give a light top-dress of fertilizer monthly once the plants are about a foot tall. Potatoes need potassium most of all (it builds the tubers), so a tomato or potato-specific fertilizer works beautifully. Avoid high-nitrogen fertilizers, which make huge leafy plants with disappointingly few potatoes.
Step 5: Harvest New Potatoes First
New potatoes - thin-skinned, sweet, and utterly delicious - are yours from about week 8 to 10 for early varieties. When the plants begin to flower, you can gently dig your fingers into the soil along the edge of the container and pull out a few golf-ball-size tubers to enjoy immediately. Replace the soil afterwards and let the plant keep growing.
For a full-size harvest, wait until the foliage naturally yellows, wilts, and dies back. This usually happens 2 to 3 weeks after flowering for earlies, and much later in the fall for main crops. This is nature’s signal that the skins have set, and your potatoes are now storage-ready.
Harvest on a dry day, tip the container onto a tarp, and sort through the soil by hand to avoid cutting the potatoes.

Common Container Potato Problems and Fixes
| Problem | What it looks like | The fix |
|---|---|---|
| Green potatoes | Green patches on tubers | Hilling failure or light exposure; cut off green parts, re-bury exposed tubers |
| Small harvest | Few tiny tubers at harvest | Not hilled enough, too little water, or too much nitrogen fertilizer |
| Leggy plants | Tall thin stems, few leaves | Not enough sun; move to 6–8 hours of direct light |
| Wilting yellow plants | Foliage collapses, brown spots | Could be blight; remove infected foliage, never compost it |
| Rotting tubers | Soft, smelly potatoes | Overwatering or no drainage; let soil dry between waterings, drill more holes |
| Scab | Rough, corky patches on skin | Keep soil moisture even and slightly acidic; avoid fresh manure at planting |
| Slugs and worms | Holes chewed into tubers | Hand-pick slugs at dusk, use slug fences or diatomaceous earth around the bag |
Early blight is the most serious common disease - it arrives in late summer as brown blotches on the leaves that spread quickly in humid weather. Remove affected leaves promptly, water at the base of the plant rather than over the foliage, and try to harvest all earlies before blight season arrives in your area.
A Season-By-Season Planting Schedule
Container potatoes can be grown like clockwork once you know your seasons. Here is a simple calendar that works in most temperate climates:
| Season | What to do |
|---|---|
| Late winter | Order or buy seed potatoes; start chitting 3–4 weeks before planting |
| Early spring | Plant first and second earlies once soil hits 45°F; cover bags with fleece if frost threatens |
| Mid-spring | Plant main crop varieties; start hilling as growth appears |
| Late spring | First hilling done; side-dress with organic fertilizer |
| Early summer | Harvest new potatoes from earlies about 2 weeks after flowering begins |
| Mid-summer | Harvest remaining earlies; replant the emptied bags with second earlies for a fall crop |
| Late summer | Watch for blight; water at the base of plants only |
| Early fall | Harvest main crops once foliage dies back; cure and store in a cool, dark place |
Timing shifts roughly two weeks later in cool northern climates and two weeks earlier in warm southern ones. The secret to a long potato harvest is not one big container - it is a stagger of small ones planted two to three weeks apart, so something is always ready to pull.
How to Store Your Potatoes
Potatoes store best in a cool, dark, dry place - around 40–50°F (4–10°C) - with good air circulation. A garage, cellar, or cupboard away from heaters is ideal. Do not wash the potatoes before storing; if you can, let them cure for a week or two in a dark, airy spot so their skins thicken and small scrapes heal over.
Store them loose in paper bags, cardboard boxes, or a breathable hessian sack - never in sealed plastic bags, which trap moisture and cause rot. Check them every couple of weeks and remove any that sprout or soften before the rot spreads. Kept properly, main crop potatoes will cheerfully last through the winter.
And do not store potatoes near onions - each makes the other sprout faster.
Beyond the Basics: Grow Potato Towers
If you have ever seen a photo of a “potato tower” and wondered if it works, here is the honest answer: stacking several layers of potatoes in a tall cage rarely produces more than a normal container, and often less. Growing every single stem layer at once simply does not work - potato plants form tubers on one burial round of the main stem, so a tower gives you one harvest level plus a lot of warm, empty soil above.
The better trick for a bigger harvest without a bigger bag is two containers, staggered. Plant one container with earlies in early spring, harvest it in early summer, and replant it the same day with a second-early variety for a fall harvest. Two crops from the same bag in one season can beat a single jumbo container.
Frequently Asked Questions
Q: Can I use a bag of potting soil as my container?
A: Yes, this is a classic trick: buy a filled bag of potting mix, cut drainage slits in the bottom, lay it flat, plant seed potatoes on top, and hill with the soil that came in the bag. When the bag is empty of soil, it has effectively become your grow bag.
Q: What happens if I plant a whole grocery store potato?
A: It may grow, but it is risky. Grocery potatoes are often sprayed to slow sprouting, and they can carry diseases like late blight into your garden. Always use certified seed potatoes, which are grown disease-free and sprout reliably.
Q: How can I tell when to water without a moisture meter?
A: Push a finger into the soil up to the second knuckle. Moist and cool means wait; dry means water. On very hot days, also watch the leaves - drooping foliage at midday is a clear water warning.
Q: Do potatoes need fertilizer after planting?
A: A monthly light feeding after the plants are about a foot tall is enough. Always err on the side of less: overfeeding makes leaves, not potatoes.
Q: Can container potatoes get late blight?
A: Yes, blight arrives by wind and rain regardless of the container. Growing earlies and harvesting early is the best protection, but if blight appears, cut off all affected foliage immediately and remove the container away from other plants.
