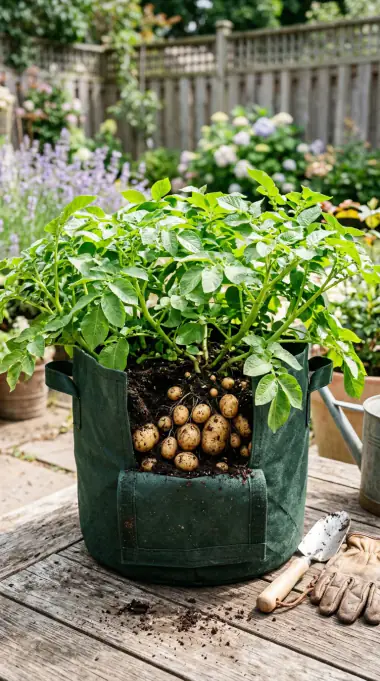

Potatoes in containers are one of the few crops that reward you twice: first with the absurd pleasure of a healthy green plant, then with the small miracle of tipping out a pot and finding actual food buried in the mix. But the feeding is where most container crops go wrong. I have grown pots that produced a waist-high forest of leaves and four marble-sized tubers, and I have grown pots that gave me a bucket of clean, floury potatoes from the same volume of soil. The difference was not the variety. It was the ratio and the timing.
The mistake is treating potatoes like tomatoes. Tomatoes want a steady push of nitrogen and will happily grow until frost. Potatoes are a storage crop. They need enough nitrogen to build a canopy that can photosynthesize, then they need phosphorus and potassium to move energy into tubers. Push nitrogen too long and the plant keeps making leaves while the tubers stay small. Push too little and the canopy stalls before it can fill the pot with roots.
This guide is the feeding plan I use for containers now: what to mix at planting, when to side-dress at each hilling, how much per gallon, and how to read the leaves when something is off. It assumes you are growing in a pot, bag or bucket, not in the ground, because the math is different. A container holds a fixed volume of nutrients, and every watering takes some of them away.
Quick Answer: Mix a low-nitrogen blend such as 5-10-10 into the lower half of the container at planting — about half a cup per 10 gallons of potting mix — and add a handful of bone meal if your mix has no phosphorus. Side-dress with 1 to 2 tablespoons per plant at each hilling, then stop nitrogen once the plants flower. Keep the pH around 5.0 to 6.0, water evenly, and harvest new potatoes at 10 to 12 weeks.
At a Glance
| Fact | Details |
|---|---|
| Best base feed | 5-10-10 or 10-10-10, low nitrogen |
| Rate at planting | ½ cup per 10 gallons of mix |
| Side-dress | 1–2 tablespoons per plant at each hilling |
| Stop nitrogen | When flowers open |
| Soil pH | 5.0–6.0 |
| Container size | 10–15 gallons, 12–18 inches deep |
| Water | 1–1.5 inches per week, evenly |
| New potatoes | 10–12 weeks after planting |
| Mature potatoes | 16–20 weeks after planting |
Why potatoes need a different ratio
A potato plant has two jobs. First it builds a canopy of leaves to capture sunlight. Then it moves the sugar from those leaves down into tubers. Nitrogen supports the first job. Phosphorus and potassium support the second.
If you feed a balanced or high-nitrogen fertilizer throughout the season, the plant never gets the signal to stop growing leaves. You end up with a beautiful plant and a disappointing harvest. This is especially common in containers, where the restricted root zone makes the plant more sensitive to what is available.
The other difference is pH. Potatoes are one of the few vegetables that prefer acidic soil, around pH 5.0 to 6.0. At that pH, phosphorus is available and potato scab, a bacterial disease that blemishes tubers, is less severe. Most potting mixes are already in a reasonable range, but if you add lime out of habit, you push the pH up and invite scab. Do not lime potatoes unless a soil test tells you to.
Finally, potatoes are sensitive to fresh manure. It is too rich, it can carry disease, and it encourages scab. Use finished compost instead. If you want manure, make sure it has been composted for at least a year and mix it well into the lower layer.
What each nutrient does
Nitrogen builds stems and leaves. Young potatoes need a moderate supply to get established. Too much produces dark, rank growth and delays tuber set. Too little produces pale, thin plants that never fill the pot.
Phosphorus supports root development and tuber initiation. Potatoes take it up slowly, so it needs to be present at planting rather than added as a rescue later. Bone meal, rock phosphate and balanced granular blends are the usual sources.
Potassium is the tuber nutrient. It drives starch formation, skin quality and storage life. Potatoes use more potassium than any other nutrient. A shortage shows as yellow or brown leaf margins and small, poorly storing tubers.
Calcium and magnesium matter for cell structure and chlorophyll, but deficiencies are rare in a good potting mix. Do not add Epsom salt unless you see interveinal yellowing on older leaves and have ruled out overwatering.
The ratio by stage
| Stage | Timing | Ratio | Amount |
|---|---|---|---|
| Planting | Day 0 | 5-10-10 | ½ cup per 10 gallons, in the lower half |
| First hilling | Stems 6 inches | 5-10-10 | 1 tablespoon per plant |
| Second hilling | Stems 12 inches | 5-10-10 | 1 tablespoon per plant |
| Flowering | 8–10 weeks | 0-5-10 or similar | 1 tablespoon per plant |
| Bulking | After flowering | Potassium only | Liquid kelp every 2 weeks |
The switch at flowering is the key. Once you see flowers, the plant has finished building its canopy and is ready to bulk up. From that point, nitrogen is a liability. Use a low-nitrogen feed or plain compost tea, and let the plant finish.
Choosing the container and the mix
A potato plant needs depth because tubers form above the seed piece, along the buried stem. A 10-gallon pot that is 12 to 15 inches deep will grow a decent crop. A 15-gallon fabric bag or a 20-gallon tub gives you more room and a bigger harvest, but it also needs more mix and more water.
Fill the bottom third with a mix that drains well. A 50-50 blend of potting mix and finished compost works well. Add the granular fertilizer to that lower layer and mix it thoroughly. Then add another third of plain mix, place the seed potatoes, and cover them with 2 to 3 inches of mix.
Do not fill the container to the top at planting. You need room to hill as the stems grow. Leave at least 6 inches of freeboard.
Use seed potatoes, not supermarket potatoes. Supermarket potatoes are often treated with sprout inhibitors and can carry disease. Chit them in a cool, bright room for two to three weeks before planting so they develop short, sturdy sprouts.
The step-by-step feeding schedule
Step 1: At planting
Mix ½ cup of 5-10-10 into the lower half of a 10-gallon container. If your mix contains no phosphorus, add 1 cup of bone meal as well. Plant two seed potatoes per 10-gallon pot, spaced about 8 inches apart, with the sprouts facing up. Cover with 2 to 3 inches of mix and water gently.
Do not add nitrogen fertilizer at this stage beyond what is in the blend. The seed potato has enough energy to start the plant, and the compost supplies a gentle base.
Step 2: First hilling, stems at 6 inches
When the stems are about 6 inches tall, add mix around them until only the top 3 inches of stem is exposed. This is hilling. It encourages more stem roots and more tuber sites. As you hill, scratch 1 tablespoon of 5-10-10 per plant into the new layer and water it in.
Hilling is not optional for containers. Without it, the tubers form near the surface, turn green in the light, and produce solanine, which makes them bitter and unsafe to eat.
Step 3: Second hilling, stems at 12 inches
Repeat when the stems reach about 12 inches. Add mix, leave 4 to 6 inches of stem, and side-dress again with 1 tablespoon per plant. By now the container should be nearly full. Stop hilling when you reach the rim.
If you are growing in a fabric bag, roll the top down at planting and unroll it as you hill. That gives you extra height without buying a taller bag.
Step 4: Flowering
When the first flowers open, stop nitrogen. Switch to a low-nitrogen, high-potassium feed such as 0-5-10, or use liquid kelp every two weeks. This is the signal to the plant that the canopy is done and the tubers should bulk up.
Some potato varieties flower heavily; others barely flower at all. If yours does not flower, use the calendar instead: about eight weeks after planting, switch to the low-nitrogen feed.
Step 5: Bulking and harvest
Keep watering evenly while the plants are green. As the vines yellow and die back, reduce water. Stop watering completely about two weeks before harvest so the skins set. For new potatoes, harvest when the plants are still green and flowering, about 10 to 12 weeks after planting. For mature storage potatoes, wait until the vines die back, usually 16 to 20 weeks.
Tip the container onto a tarp rather than digging with a fork. You will bruise fewer tubers, and you will find every one.
How much fertilizer per container size
| Container | Mix volume | Fertilizer at planting | Side-dress each hilling |
|---|---|---|---|
| 5 gallons | ~0.7 cu ft | ¼ cup 5-10-10 | 1 teaspoon per plant |
| 10 gallons | ~1.3 cu ft | ½ cup 5-10-10 | 1 tablespoon per plant |
| 15 gallons | ~2 cu ft | ¾ cup 5-10-10 | 1½ tablespoons per plant |
| 20 gallons | ~2.7 cu ft | 1 cup 5-10-10 | 2 tablespoons per plant |
A 5-gallon bucket can grow potatoes, but the harvest is small and the mix dries out fast. If space allows, go bigger. The difference in yield between 5 and 15 gallons is not marginal; it is often double.
Organic options
Compost is the foundation. Use finished compost for at least a third of the mix. It supplies slow-release nutrients, improves water holding, and supports the soil life that helps roots take up phosphorus.
Bone meal is a slow phosphorus source, usually 3-15-0. Add 1 cup per 10 gallons at planting. It breaks down over months, so it will not rescue a deficiency mid-season, but it feeds the plant steadily.
Kelp meal or liquid seaweed supplies potassium and trace minerals. Use it every two weeks during bulking, especially in sandy or bark-based mixes that leach quickly.
Wood ash is a potassium source, but it raises pH. Use at most ¼ cup per plant, only if your pH is below 6.0, and never mix it with lime. Too much ash can push pH into scab territory.
Fish emulsion is a gentle nitrogen source early in the season. Use it at half strength if plants look pale before flowering. Stop once flowers open.
Avoid fresh manure, high-nitrogen lawn fertilizer, and any feed labeled “quick green-up.” They are formulated for leaves, not tubers.
Reading the leaves
| Symptom | Likely cause | Fix |
|---|---|---|
| Dark, huge leaves, few flowers | Too much nitrogen | Stop nitrogen, flush the pot, wait |
| Pale lower leaves, thin stems | Nitrogen shortage | Half-strength fish emulsion |
| Yellow or brown leaf edges | Potassium shortage or salt buildup | Kelp feed; flush if crusty |
| Purple leaves, cold soil | Phosphorus lockout from cold | Warm the pot, wait for soil above 55°F |
| Brown, crispy edges after feeding | Fertilizer burn | Flush with twice the pot volume of water |
| Small tubers, healthy plant | Too much N or too little sun | Stop N, move to full sun |
The most common container mistake is not under-feeding; it is over-feeding nitrogen early and then panicking when the plant makes leaves instead of tubers. If your plant is lush and flowerless at eight weeks, stop feeding and give it plain water for two weeks.
Watering and pH
Potatoes need consistent moisture. Dry spells followed by heavy watering cause hollow heart, a brown cavity inside the tuber, and cracked skins. Aim for about 1 to 1.5 inches per week, delivered in deep soakings rather than daily splashes.
In a container, check the top inch of mix before watering. If it is dry, water until it runs out the bottom. If it is still damp, wait. Mulch the surface with straw or compost to slow evaporation.
Test pH once at planting if you can. Potatoes do best at 5.0 to 6.0. If your mix is above 6.5, add elemental sulfur according to the label and wait a few weeks before planting. Do not add lime.
Frequently Asked Questions
Q: What is the best fertilizer for potatoes in containers?
A: Use a low-nitrogen, higher-phosphorus and potassium blend such as 5-10-10 at planting, about half a cup per 10 gallons of mix. Side-dress lightly at each hilling with the same blend, and avoid high-nitrogen lawn or tomato feed after flowering.
Q: Should I fertilize potatoes when I plant them?
A: Yes, but mix it into the lower half of the container rather than around the seed piece. Potatoes take up phosphorus and potassium slowly, so it needs to be in the root zone from the start. Keep nitrogen moderate to avoid a jungle of leaves and few tubers.
Q: Why do my container potatoes have huge plants but no tubers?
A: Too much nitrogen, too little light, or planting too late are the usual causes. Potatoes set tubers when the plant shifts from leaf growth to storage. High-nitrogen feed keeps it in leaf mode. Stop nitrogen after flowering and make sure the pot gets six to eight hours of sun.
Q: Do potatoes in pots need lime?
A: Usually not. Potatoes prefer slightly acidic soil around pH 5.0 to 6.0, and lime raises pH, which encourages potato scab. Add lime only if a soil test shows the pH is below 5.0, and use it a season ahead of planting.
Q: How often should I water potatoes in containers?
A: Water deeply whenever the top inch of mix feels dry, usually every one to two days in summer. Aim for about 1 to 1.5 inches per week. Uneven watering causes hollow heart and cracked tubers, so consistency matters more than the exact amount.
Related Articles
- How to Grow Potatoes in Containers
- How to Grow Potatoes
- When to Harvest Potatoes
- How to Store Potatoes So They Last Longer
- Best Fertilizer for Vegetable Gardens
- NPK Ratios for Vegetables
- Vegetable Garden Fertilizer: N-P-K Explained & How to Feed
- Vegetable Garden Fertilizer: N-P-K Explained & How to Feed
Sources & References
- University of Minnesota Extension — https://extension.umn.edu/vegetables
- Cornell Vegetables — https://www.vegetables.cornell.edu/
- University of California IPM — https://ipm.ucanr.edu/
- Clemson HGIC — https://hgic.clemson.edu/
- Penn State Extension — https://extension.psu.edu/